Alkyd Paint: Magic or Misery?
Let me start this off with a confession: <WHISPERING> I sometimes paint wood that hasn’t already been painted. Whew! It feels great to get that off my chest! I know many people consider unpainted wood as holy ground. Never shalt thou paint the unpainted wood! Don’t get me wrong. I LOVE stained wood, especially wood with a beautiful grain pattern. I’ve even been known to strip the paint from a furniture piece just to see if someone painted over a treasure. But sometimes the wood grain is just kind of ho hum. Or sometimes there is damage that would be disfiguring if the repair were stained. Paint does, after all, cover a multitude of sins.
And sometimes there is just TOO MUCH wood in a space (Yes, I DO think there can be such a thing as too much wood. Sorry! I hope we can still be friends. 🙂 ). Painting a piece of furniture or cabinetry actually helps you to be able to appreciate the stained wood that remains in the space, rather than it getting lost in a sea of different wood tones. It can also provide a beautiful pop of color in an overall neutral palette. Sometimes, to be honest, there just isn’t TIME to go through all of the steps necessary to achieve a beautiful, stained finish. Painting is much faster, and much more forgiving of errors.
Once you decide that paint is the way you want to go with your project, now what? A product that is extremely popular right now is chalk paint. There are many reasons for its current popularity. It provides a matte finish, which helps mask small imperfections, and is environmentally friendly. It’s easy to use and comes in a number of attractive colors. There is a plethora of information out there by chalk paint lovers about the hows, whens, wheres, and whys of the use of chalk paint. And if that is your jam, GREAT! More power to you! I’m happy that you’re happy. Chalk paint is not MY paint of choice, however. Whether painting a bathroom vanity, a wall cabinet, or a furniture piece, I prefer that paint have a bit of a sheen to it. Or maybe a lot of sheen to it, depending on the piece.
Chalk paint also has a limited number of colors available, depending on the manufacturer. I am a color snob. Once I have a vision for a piece, I will obsess over getting the shade exactly right, even to the point of sometimes mixing my own. I am also, not to put too fine a point on it, a TOTAL KLUTZ! Any furniture or cabinetry in my home WILL have things spilled on it, items dropped on it, and/or be knocked into by some part of my person or something I’m carrying. I also have 5 children. Need I say more? In order to achieve significant durability with chalk paint, it has to be waxed. Even then in my experience, it doesn’t have the durability of my paint of choice: alkyd paint.
Alkyd paint is (from my unscientific viewpoint) a magical concoction that somehow takes ordinary latex paint and mixes in oil, culminating in a water-based paint that has many of the properties of oil-based paints without the noxious fumes or pain-in-the-tuckus paint thinner cleanup. It does take longer to cure than ordinary latex paint (7 days to be cured enough for light use, compared to a few days for latex), but once it DOES cure, it’s more durable than latex. It’s very scrubbable as well. It can also be mixed in any color you choose, so the color snob in me can obsess over countless paint chips from every possible paint company, and then second guess myself to my heart’s content. 🙂
It is a bit more expensive than latex paint, but I think the durability makes it worth the extra $$. I painted the cabinets in my kitchen two houses ago with latex paint, and there were periodic touch-ups needed until the day we moved. (Yes, they were thoroughly washed down, sanded, and primed prior to painting.) While I haven’t painted any kitchen cabinets (YET!) since my discovery of alkyd paint, I HAVE done 4 bathroom vanities, 2 medicine cabinets, and several furniture pieces. None of them have required any touching up once cured, which if you reference my comment above about how very much of a klutz I am (and my 5 kids), is a testament to the durability of alkyd paint! Most of my kids have now grown up and left home, but I am, and always shall be . . . a klutz.
In terms of brands of alkyd paint, I’ve tried Valspar Cabinet Paint and Valspar Furniture Paint (both from Lowes), and Behr Alkyd Paint (from Home Depot). From what I can tell, Valspar Cabinet, Valspar Furniture, and Behr Alkyd paints are the same thing other than the art on the label. There is one other significant difference. Behr Alkyd paint is significantly cheaper than either the Valspar Cabinet or Valspar Furniture paints. Given the lack of compelling reasons to spend more money on the Valspar . . .
Applying alkyd paint does present some challenges. Its longer drying time means that there is a greater chance of getting runs in your paint when applying to vertical surfaces. So if you’re one of those people who try to put paint on as thickly as possible so as to have fewer coats — STOP! Thin coats are always better no matter what type of paint you’re applying, but especially with alkyd paint. Even when applying thinly, make sure to go back over your piece a few times to check for drips or runs. Depending on temperature and humidity, dry time can be anywhere from 4 – 8 hours between coats. In a very warm, dry room (my laundry room in the winter) I’ve been able to successfully recoat as soon as 2 hours. I knew I was taking a risk, but my gut said to go for it. (And I was in a time crunch, prepping a house for sale.) But a little hint, thinner coats also dry more quickly, so it’s a win-win as far as I’m concerned.
Many paint ads, for all types of paint, will claim that if you use their product you won’t have brush strokes. I can’t tell you how many times I have been disappointed by various products making that claim, including alkyd paints. Yes, the longer dry time allows some leveling to occur, but even with very high quality paint brushes, I still end up with significant brush marks. Did I mention that I hate brush marks in my paint finish? I do. I really, REALLY do. And even if alkyd paint did prevent brush marks, if I apply my primer with a brush, THOSE brush strokes usually show through, regardless of how I apply my paint. Some paint store employees will tell you that you don’t need to prime when using an alkyd paint. I’ve done it both ways and much prefer the finish when I primed first, especially if I had to do repairs with wood putty.
I’ve tried using foam rollers to apply, but there are two problems that crop up: First, I tend to get too much paint in some spots, which leads to an odd, alligator skin texture in some of the paint. Second, I get a LOT of bubbles in my paint. The bubbles issue I’ll come back to. But a very helpful YouTuber named Paul Ricalde had a suggestion that I gave a try, and then modified slightly for my purposes. I use it with both primer and paint coats. (He recommended spraying on automotive primer, but I don’t have a great setup for spraying.) Paul suggested that you could get a “sprayed-on” look on your cabinets by applying the paint with a brush, and then going over the surface with a ⅜” knap roller to get rid of the brush marks. When I tried it, I found that the ⅜” knap roller soaked up a LOT of the paint I had applied, and got saturated very quickly, requiring switching rollers frequently to avoid an unsightly texture. Maybe it was something I was doing incorrectly, I don’t know. But I felt I was wasting a lot of paint. I tried the same technique using a foam roller to get rid of the brush marks, and was much happier with the result. It did, however bring me back around to another issue I’ve mentioned before with foam rollers: bubbles in the paint on my project. Thankfully, I found a solve for that as well.
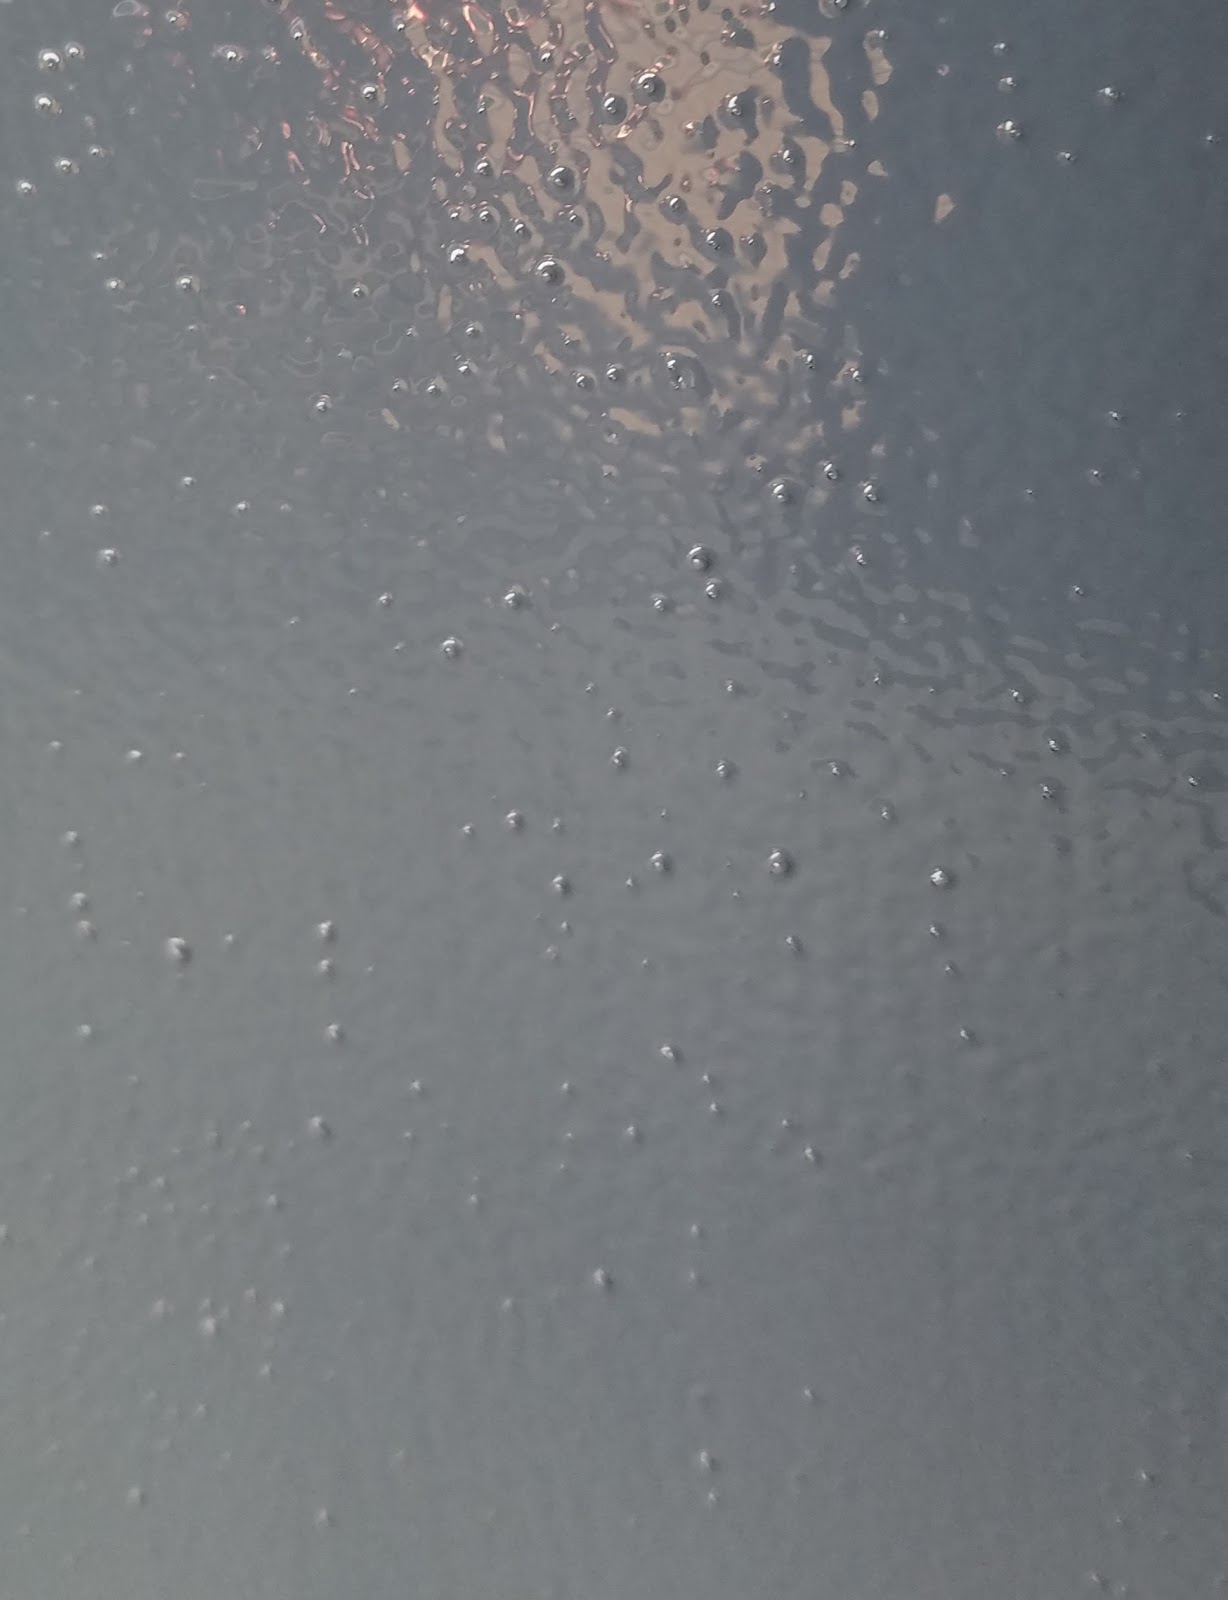
I seem to get more bubbles in dark-colored paints than in light-colored ones. I’m guessing that since dark colors require adding more pigment, that contributes to the issue. Or perhaps the formula for the dark base is slightly different than that for the light base. Regardless, bubbles are a fact of life with alkyd paints. As an aside, I’ve encountered the same issue with many latex paints as well. Occasionally even primer will bubble. The first tip is DON’T PANIC.
I understand the adrenaline rush that comes with fearing you’ve just destroyed all of the careful work you did in the surface prep and will have to start over. Take a deep breath. Ignore the bubbles for now and move on to another surface. After a few minutes, come back to the bubbled surface. VERY LIGHTLY, with almost no pressure, roll over the surface again, focusing on areas that need those pesky bubbles popped. You may have to go back over a few times. If it isn’t helping, you may have come back too soon for the amount of paint you applied. Move on and come back again in another couple of minutes. It’s also possible that your roller has gotten too saturated. You can either switch out the roller cover or run the roller over another surface ( such as the back of the piece, where the quality of the finish is less vital) to get some of the paint off before going back and trying again.
You may have some spots where bubbles are particularly stubborn. For those, the end of the roller, which should be pretty much dry, can come in handy. Use that to dab at individual spots. On your first coat, you may be seeing small circles where bubbles popped. Have no fear. Those will be sorted out in future coats. Like anything else, it will take a little bit of practice to get a feel for how much paint to brush on, how soon to use the roller the first time, how to roll when popping bubbles, etc. But I feel it’s well worth it for the smooth, durable finish you end up with.
As I mentioned in the very beginning, paint is a very forgiving medium for finishing furniture. Worst case scenario: you mucked it up a bit and are unhappy with the look of your finish. No worries! Wait for it to dry thoroughly. Sand it down some with 220 grit sandpaper to remove unwelcome textures. Do another coat of paint. Like magic, all is forgiven and you have a beautiful piece for your home.